
Communication
General Guidelines
Section titled “General Guidelines”Communication is an essential factor for team-play. A certain level of standardisation ensures quick and precise communication while limiting misunderstandings. This section features all important Communication-related basics. You will find more situation-based communication guidelines in the relevant sections.
When it comes to Communication there are several core principles:
- Compact - Information should always be given with as few words as possible. Keeping it short will ensure the ability for others to have their necessary air time to convey their messages.
- Clear and Precise - Your messages should be clear and precise. Use appropriate known terminology.
- Confirmation - Always confirm or even read-back orders given. An unconfirmed order should be handled as a non-received order, meaning while somebody is failing to confirm, you repeat until confirmation.
- Allocatable - Always start with alerting the recipients of your message and then state who you are (e.g. “Command, this is Alpha”, ‘Command’ as Recipient and ‘Alpha’ as Sender)
To ensure good communication you always need to evaluate which information should be broadcast on which channel. There are multiple channels available, although not all of them are available for each individual.
- Direct Talk (talking normal)
- Squad Radio/Net (main Rifleman Radio)
- Platoon Radio/Net (Leader, 2IC and Special Roles)
- Command Radio/Net (Support Coordination Channel usually Long Range)
Based on the information and the availability of your individual accessible channels you have to make a decision on what channel to use. There are some basic guidelines when to use Direct Talk and when to use the Radio.
Direct Talk:
- Shout when using a Grenade (Frag out, Smoke out, Flashing,…)
- Communicate with people in proximity, when all recipients can hear you
- Preferably with your buddy team, if radio not absolutely necessary
Radio (Squad Net):
- Man down!
- Orders
- Spotted Enemies
- Reports
- Buddy Team coordination (from Team to Team or Squad Lead to Team)
- All relevant information where recipients are out of Direct Communication range or the importance of this information is so high that it needs to be ensured everyone has to receive it
Radio (Platoon/Command Net):
- Orders
- Reports and Status Information
- Enemy Movement
- Force Coordination
Radios
Section titled “Radios”On default each soldier is carrying a Rifleman Radio AN/PRC-343. Each Squad has their own Squad Net. The Squad Leaders, 2nd in Command, Platoon Leader, Platoon Sergeant and Platoon Medic will also carry an additional Radio connected to the Platoon Net, AN/PRC-152. Furthermore, the Platoon Sergeant will carry a Long-Range Radio to communicate with Support Units such as Aviation on the Command Net, AN/PRC-117F.
It is essential that every soldier is familiar with how to set up and use the Radio. It is mandatory that communication lines remain open at all times, e.g. if a Squad Leader is unconscious, the second in command should go on the Platoon Net and report the situation and assume control of the Squad and the Communication, while the Leader is being treated. In the end every soldier should be ready to take actions to maintain the communication at all times during the mission based on the situation of his unit. It is everyone’s duty to ensure a constant uninterrupted line of communication between all elements, no matter the costs. If your unit lacks a Radio capable of connecting to the Platoon Net (e.g. AN/PRC-343), one person may need to switch to the Platoon Actual Net to keep a line of communication.
Hotkeys
Section titled “Hotkeys”Note that the key bindings can be changed in your settings under (configure addons).
| Keys | Action |
|---|---|
| TS3 Push-to-Talk | Direct Talk |
| Caps Lock | Talk on Radio 1 |
| T | Talk on Radio 2 |
| CTRL + Caps Lock | Talk on Radio 3 |
| Tab + Mousewheel | Adjust Talk Volume (AI will hear you) |
Radio can be opened over ACE Self-Interaction. Best is to look in your settings.
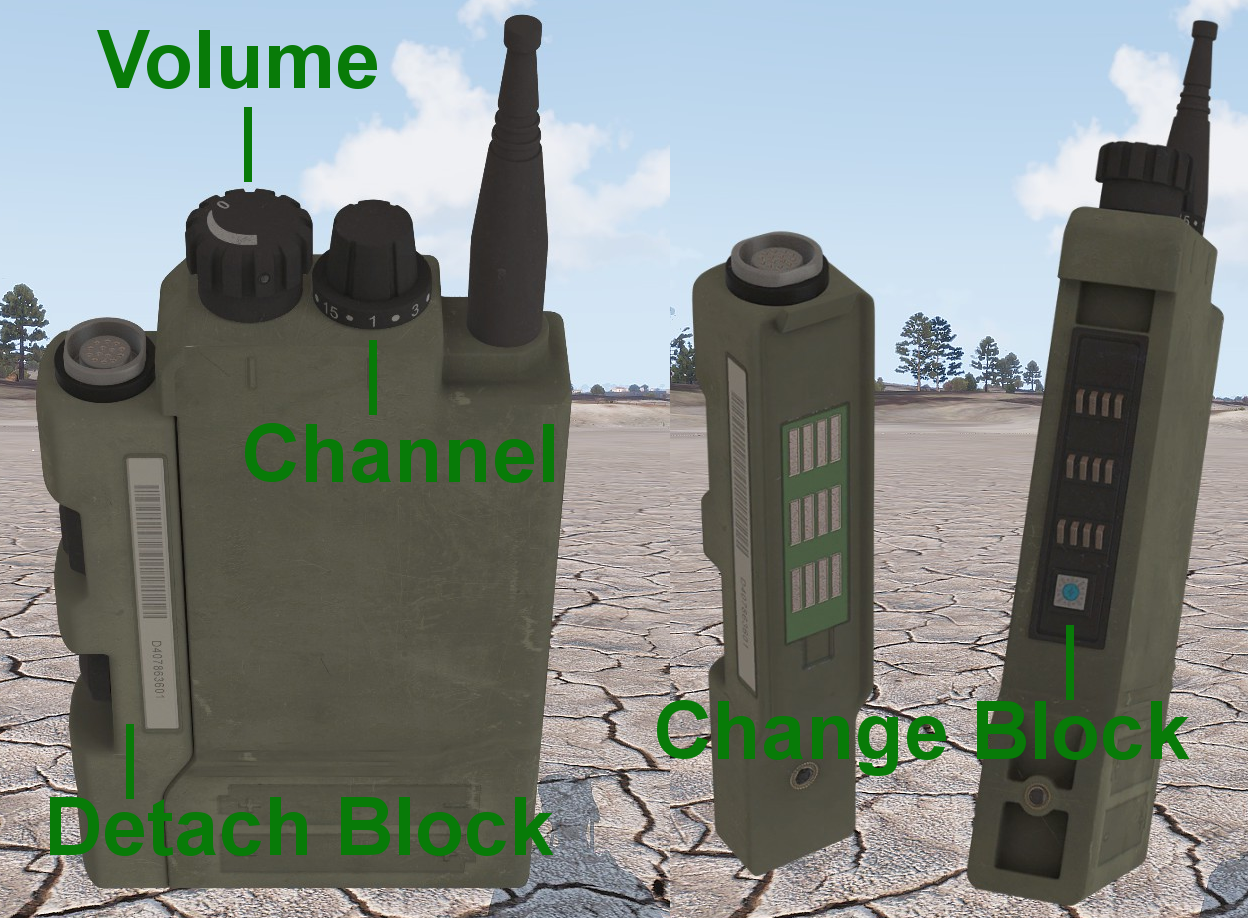
AN/PRC-343 (Rifleman Radio)
Section titled “AN/PRC-343 (Rifleman Radio)”Default Radio for every Infantryman. Set on Squad Net Channel. This radio has a limited range of 850m ideally; due to terrain interference it might be substantially lower, closer to 400m.
AN/PRC-152
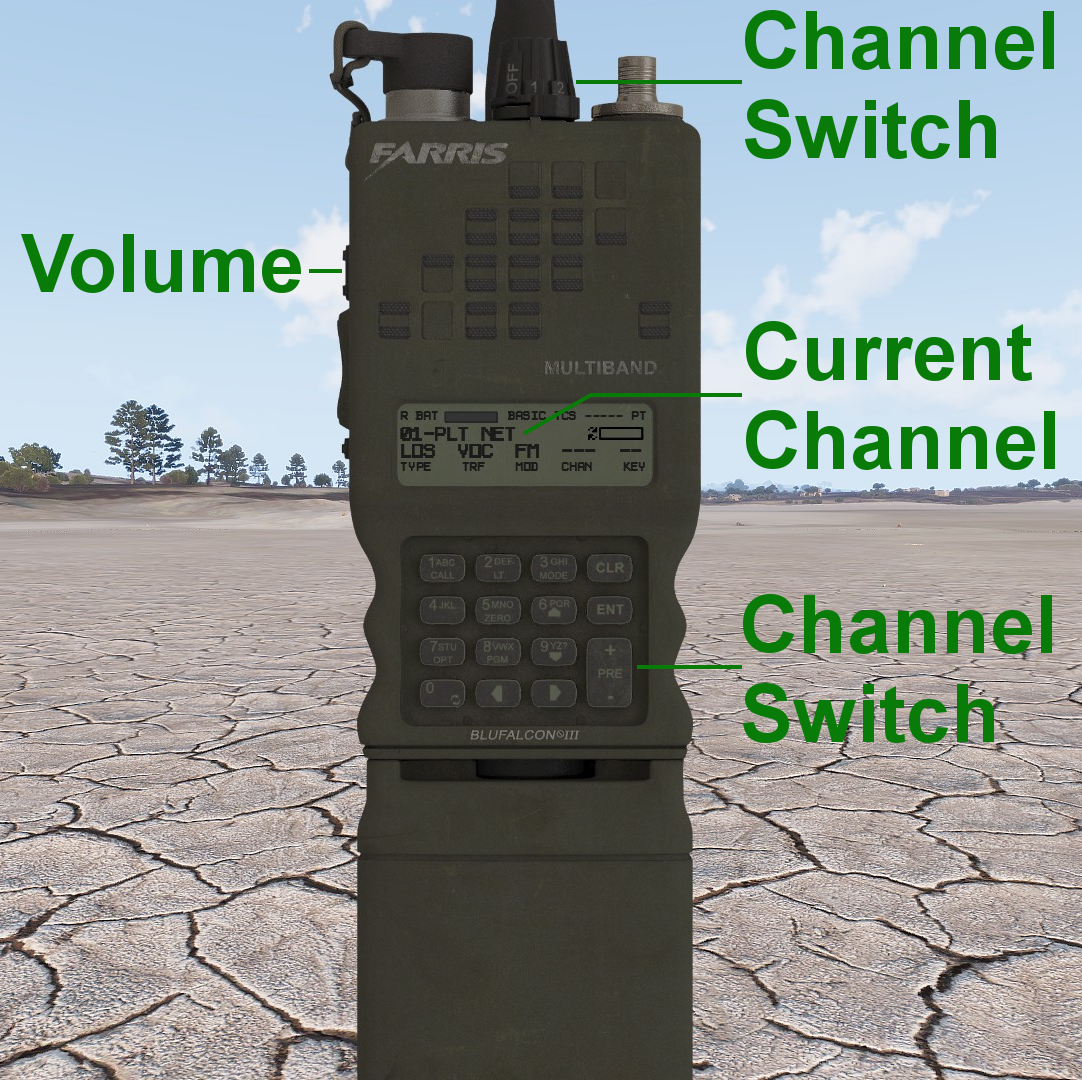
Section titled “AN/PRC-152”Default Radio for Infantry Leaders and Platoon Level Support Personnel. Set on Platoon Net Channel. This radio has an ideal range of 5-7km; due to terrain interference it might be closer to 2-5km.
AN/PRC-148
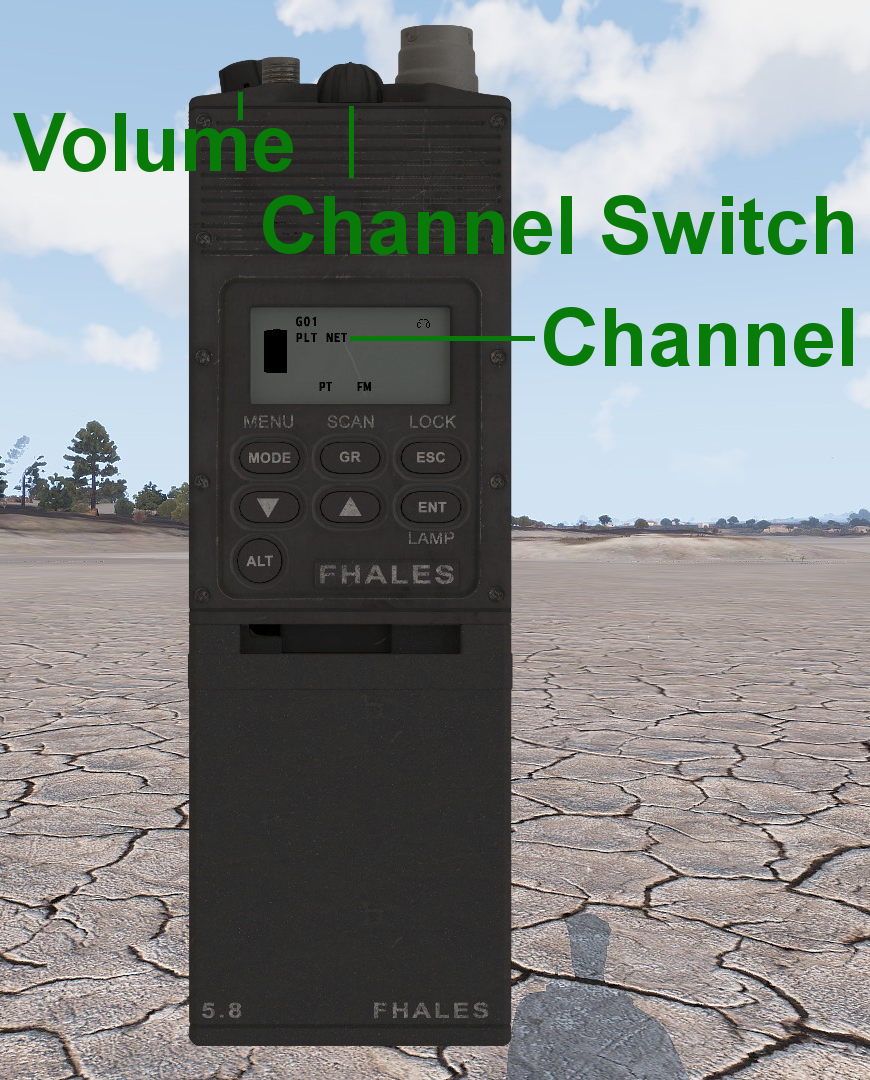
Section titled “AN/PRC-148”Radio for certain Support Units such as Aviation. Set on the Support Area Specific Net such as Air Net. This radio has the same range as the AN/PRC-152.
AN/PRC-117F (Long Range Radio)
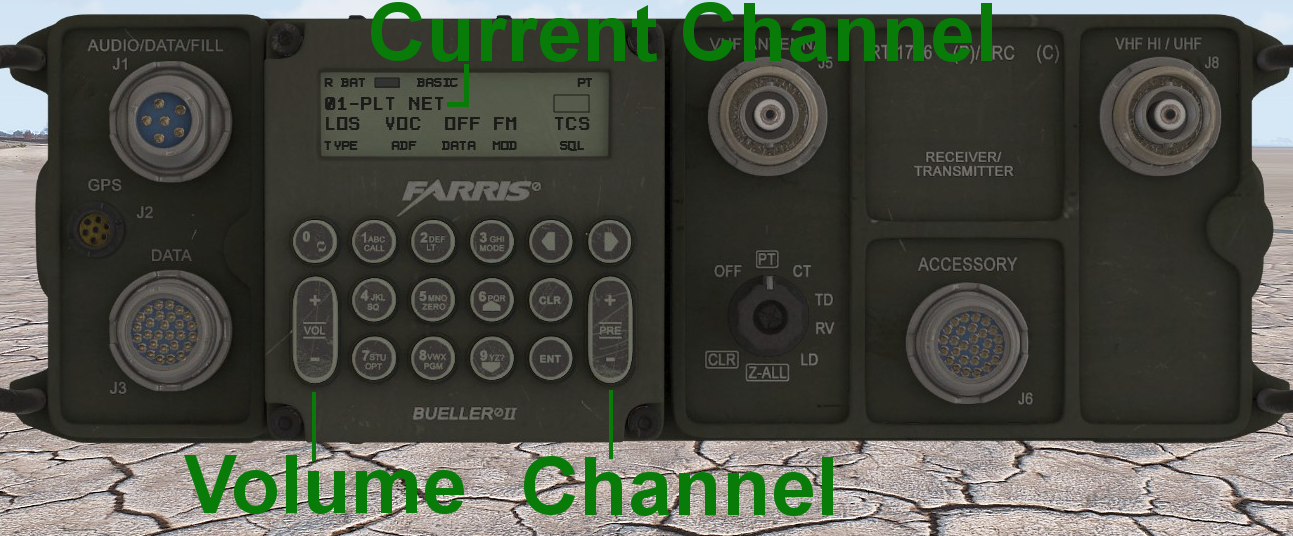
Section titled “AN/PRC-117F (Long Range Radio)”Radio carried by the Platoon Sergeant and Support Units such as Aviation and Recon. Set mostly on Command Net. This radio has a range of 10-20km, sometimes even more.
Stereo Settings
Section titled “Stereo Settings”Use Stereo Settings to always put the Squad Net on one ear and the Platoon Net (if Leader) on the other ear. That helps to identify the used Channel in a current broadcast. It is recommended to always keep it consistent.
Comm Card
Section titled “Comm Card”The Comm Card can be found in the tabs on the top right-hand side of the map in-game. Do not hesitate to use it.
Squad Net Channels
Section titled “Squad Net Channels”For the AN/PRC-343.
| Unit | Channel |
|---|---|
| Alpha | Block 1 - Channel 1 |
| Bravo | Block 1 - Channel 2 |
| Charlie | Block 1 - Channel 3 |
| Delta | Block 1 - Channel 4 |
| Platoon Actual | Block 1 - Channel 5 |
| Echo 1 | Block 1 - Channel 6 |
| Echo 2 | Block 1 - Channel 7 |
| Sierra 1 | Block 1 - Channel 8 |
| Sierra 2 | Block 1 - Channel 9 |
| Hotel 1 (REINF) | Block 1 - Channel 10 |
| Hotel 2 (REINF) | Block 1 - Channel 11 |
Cross Unit Channel
Section titled “Cross Unit Channel”For all other Radios.
| Channel | Description |
|---|---|
| Channel 1 - PLT NET | Platoon Net |
| Channel 2 - COM NET | Command Net |
| Channel 3 - SUP NET | Support Net |
| Channel 4 - MECH NET | Mechanised/Armoured Net |
| Channel 5 - AIR NET 1 | Aviation Net 1 |
| Channel 6 - AIR NET 2 | Aviation Net 2 |
Procedure and Terminology
Section titled “Procedure and Terminology”Identification
Section titled “Identification”When talking on the Radio, start each conversation by stating who you are talking to. Recipient from Sender. For Example:
Alpha SL: "Lead, this is Alpha."Platoon Leader: "Alpha, send it."Alpha SL: "Alpha is ready to move out."Platoon Leader: "Lead copies."General Terminology
Section titled “General Terminology”- Copy/Roger - Message received and understood.
- Affirmative/Affirm - Yes.
- Negative - No.
- Wilco - Will comply. Usually used with Roger (“Roger, wilco”).
- Come in - Request for a response.
- Send it - Signal to be ready for incoming message.
- Break - Signals a pause during a longer transmission.
- Clear Comms/Break, break, break - Signals all listeners to keep radio silence for an incoming priority message.
- Interrogative - Used to indicate a following question.
- Stand by - Prepare for the following Order.
- Oskar Mike - On the move.
Combat Callouts
Section titled “Combat Callouts”- Frag Out - Warning when throwing a Frag Grenade.
- Smoke Out - Warning when throwing a Smoke Grenade.
- Flashing - Warning when throwing a Flashbang.
- Grenade - Warning of a hostile grenade being thrown at friendlies.
- Bad Frag - Warning of a friendly frag grenade thrown in a way that endangers friendlies.
- Incoming - Warning of incoming fire. Usually combined with the direction of incoming fire.
- Cease Fire - Order to hold and stop fire.
- Check Fire - Order to re-identify target to ensure positive identification, used in cases of possible friendly fire.
- Hold Fire - Order to hold fire to maintain stealth.
Personal Status
Section titled “Personal Status”- Up - Report of an operational unit.
- Reloading - Report of a unit reloading.
- Weapon Empty/Dry - Report of a unit having no ammunition left.
- Set - Report of a unit being in a position to cover another unit’s movement.
Status Reports
Section titled “Status Reports”Contact Report
Section titled “Contact Report”A Contact Report contains the following Information:
- Warning - Usually “Contact!” is used to alert people to an incoming Contact Report.
- Description - Description of the Hostiles spotted.
- Direction - Direction of the Hostiles spotted from the location of the Spotter or other given Reference. Usually Cardinal Directions North/East/South/West or Compass Bearings.
- Distance - Distance of the Hostiles spotted from the location of the Spotter or other given Reference.
- Opt. Target Reference - Optional Reference Point given which is used as a base for the Direction and Distance.
- Opt. Additional Information - Optional. All Additional Useful Information about the Hostile spotted, e.g. direction of movement, awareness of our presence…
"Contact, Enemy Fire Team, bearing 060, 400 metres.""Contact, Enemy Patrol, 2 men, North, 400 metres of Alpha - 1, moving eastwards."ACE Report
Section titled “ACE Report”- Ammunition - The categorised amount of ammunition for the primary and secondary weapon.
- Casualties - Count of currently wounded and dead. Furthermore, the categorised amount of medical gear.
- Equipment - The categorised amount of Equipment in regard to Explosives, Rockets, Grenades…
ACE Reports are given as individuals to the Leader, who will compile them into an overall assessment and report that to his superior. They are used to assess a unit’s continued combat ability.
ACE Report Categories:
| Category | Meaning | Status |
|---|---|---|
| Green | more than 75% of initial quantity | fully combat effective |
| Yellow | between 75% to 50% of initial quantity | combat effective, but requires resupply soon |
| Red | below 50% of initial quantity | combat ineffective, barely operational |
| Black | below 25% of initial quantity | combat ineffective, not operational |
Example:
Report of a Squad Member to his Squad Leader:"Green on Ammo, Yellow on Medical, Yellow on Equipment, Black on AT."SITREP
Section titled “SITREP”A situational report is a quick report given to get information about the status of troops. SITREPs can be asked for at any level. It is supposed to be less detailed than an ACE Report. It should be centred around your location, objective status, combat status of your unit, and any other information that you deem relevant to the situation, e.g. status of enemy combatants.
Aviation Requests
Section titled “Aviation Requests”Request Pickup
Section titled “Request Pickup”- Location - The landing zone you request getting picked up.
- Landing Zone Details - Relevant information about the Landing Zone like landmarks that are easy to spot from the air and whether it is hot or cold.
- Optional: Friendly Location - Location of friendlies in the area.
- Optional: Recommended Approach - Direction you recommend the helicopter to approach the Landing Zone from.
- Optional: Coloured Smoke Reference - On request of the helicopter crew.
Request Supply
Section titled “Request Supply”- Location - The Drop Zone you request the Supply Drop to.
- Drop Zone Details - Relevant information about the Drop Zone like landmarks that are easy to spot from the air and whether it is hot or cold.
- Optional: Friendly Location - Location of friendlies in the area.
- Optional: Recommended Approach - Direction you recommend the helicopter to approach the landing zone from.
- Optional: Coloured Smoke Reference - On request of the helicopter crew.
Request Close Air Support
Section titled “Request Close Air Support”- Target - Target Marker (T + Number).
- Description - Description of the target and area.
- Distinctive Landmarks which help finding the target and for general orientation.
- Type of target - Target details like amount and type of enemy.
- Type of Weapon - Depending on available weaponry what you request (minigun fire, rockets…).
- Friendly Location - Location of friendlies in the area to prevent friendly fire.
- Optional: Recommended Approach - Direction you recommend the helicopter to approach the target from.
- Optional: Coloured Smoke Reference - On request of the helicopter crew.
An optimal recommended approach lets the helicopter stay clear of enemy threats and in case of landing / supply drop has all obstacles around the LZ / Drop zone in front of the helicopter and in plain sight instead of to the sides or to the rear.
Request Fire Support
Section titled “Request Fire Support”Call Structure
Section titled “Call Structure”- Warning - Use “Fire Mission” as an introduction of your request after establishing communication with the Fire Support Element.
- Type - Either “Adjust Fire” or “Fire for Effect”.
- Amount - How many rounds you request.
- Ordnance - Type of Ordnance (HE, Smoke, Illumination).
- Target Location - Either Grid or Marker Reference.
- Spreading - The area of impact, maybe even a direction of expansion of fire.
- Target Description - What type of target the artillery is called on.
- Repeat Back - The receiving Fire Support Element is repeating the critical aspects of the fire mission back as a confirmation.
Additional Terminology
Section titled “Additional Terminology”- Rounds away - First round has been fired.
- Rounds complete - Last round has been fired.
- Splash out - Warning 5-7 seconds before first impact.
- Adjust Fire - To adjust for direction and distance.
- Good/Bad Effect on Target - Feedback on effect on target.